The Atlanta Urban Debate League is committed to providing excellent debate education programs, services, and opportunities to diverse students, educators, and members of the community!

High School Open Curriculum Guide
Using Debate Template for Paperless Debate
What is Debate Template?
Debate Template is a Google Docs extension for paperless debate. It imitates some of the features from Verbatim, which only works with a full version of Microsoft Word that supports VBA macros. Debate Template can be a useful option if you don’t have access to a version of Microsoft Word compatible with Verbatim.
Installation and Usage Requirements
Installation
To install Debate Template, you will need to be logged into a Google Account for which you have administrative rights (i.e., use a personal account rather than a school account).
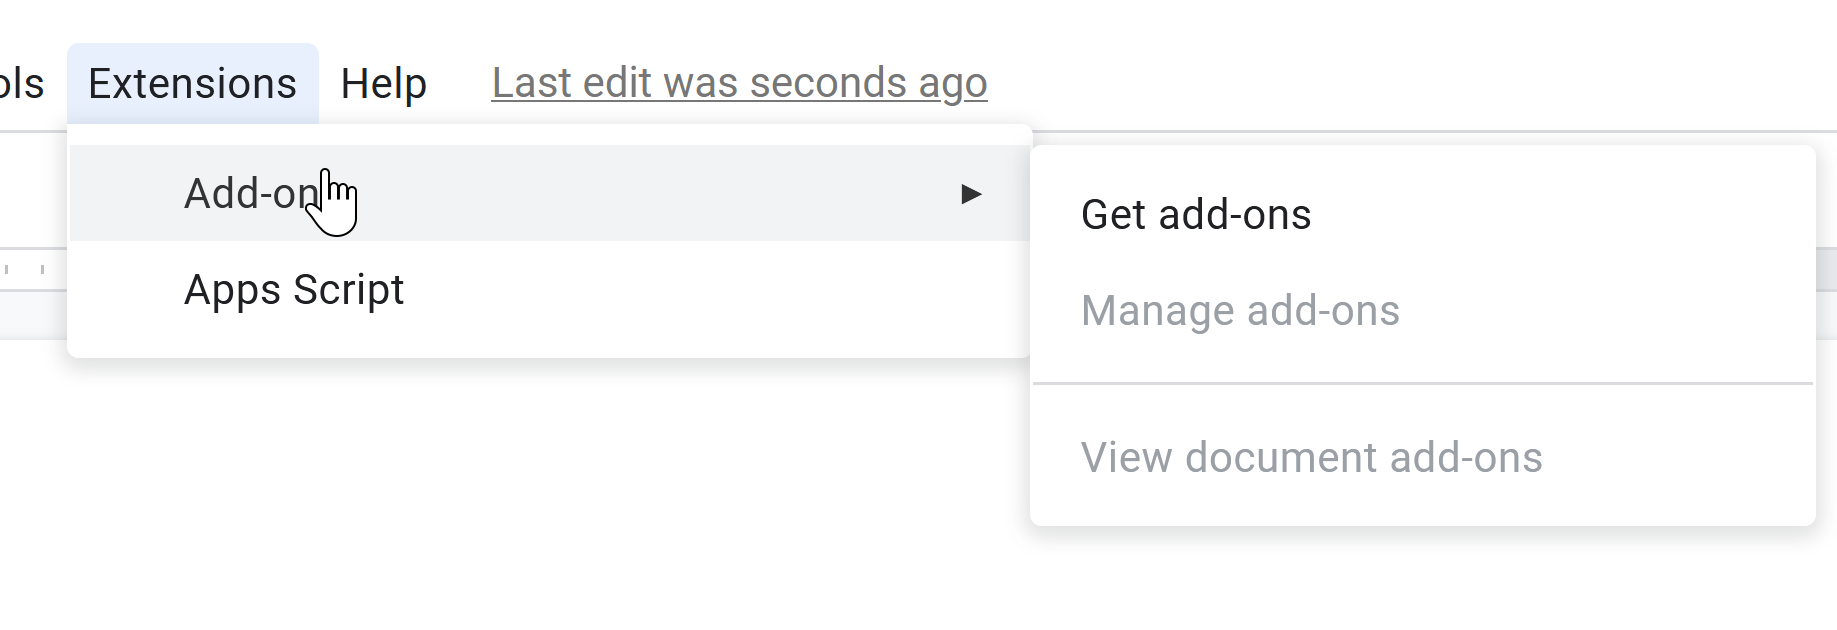
Under the Extensions tab, go to Add-ons, then click “Get add-ons” to go to Google Marketplace.

Search for “Debate Template” and look for the add-on created by Matthew Fahrenbacher. After you click Install, you will have to confirm that you want to grant the extension permissions to access your data.
After you have successfully installed Debate Template, it should appear under the Extension tab when you have a Google Doc open.
Usage Requirements
As an extension for Google Docs, Debate Template requires an Internet connection to use. Every time you use a Debate Template function, it has to communicate with Google’s servers before it executes the command. Because of this, you will likely notice some lag when using Debate Template. To minimize this lag, use more smaller files rather than fewer large files if you use Google Docs. The larger a file is, the longer it will take for Debate Template to execute any commands.
Offline Access
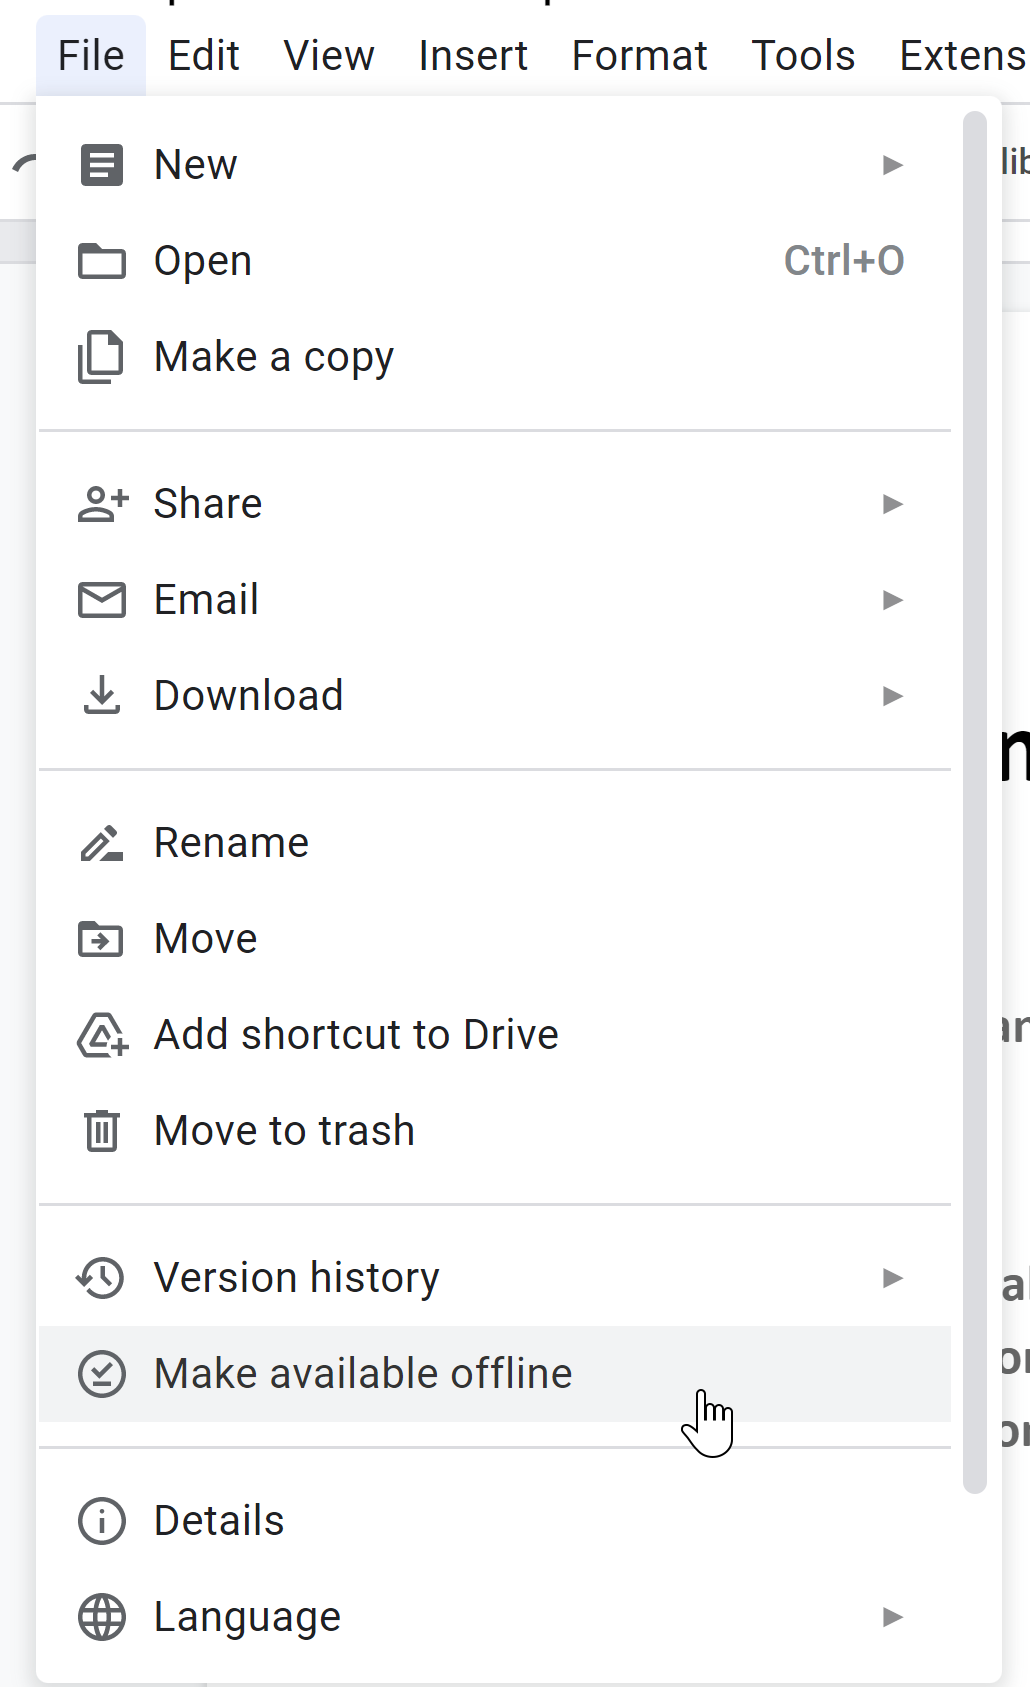
To ensure that you can use and edit your files when you don’t have a connection, you’ll have to manually choose the “Make available offline” option under File for each individual Google Doc you want to access offline. This will allow you to use the basic text-editing features of Google Docs, but you will NOT be able to use Debate Template while offline. Be sure to make your important files available offline!
Card Cutting & File Formatting Functions
Debate Template has tools for cutting and formatting individual cards and overall files. This section will go over how to use the card cutting tools for new evidence and organizing files as a whole.

The Sidebar
Under Extensions > Debate Template, selct “Show Sidebar” to have all the card cutting functions easily available. Everything listed under “Debate Tools” is for formatting cards and files. Prefs will let you tweak preferences for how each function formats text.
Card Cutting Functions
Clear
If you are cutting a new card, the text may retain formatting from its original source after you paste it. Use the Clear function to remove all formatting changes from the text.
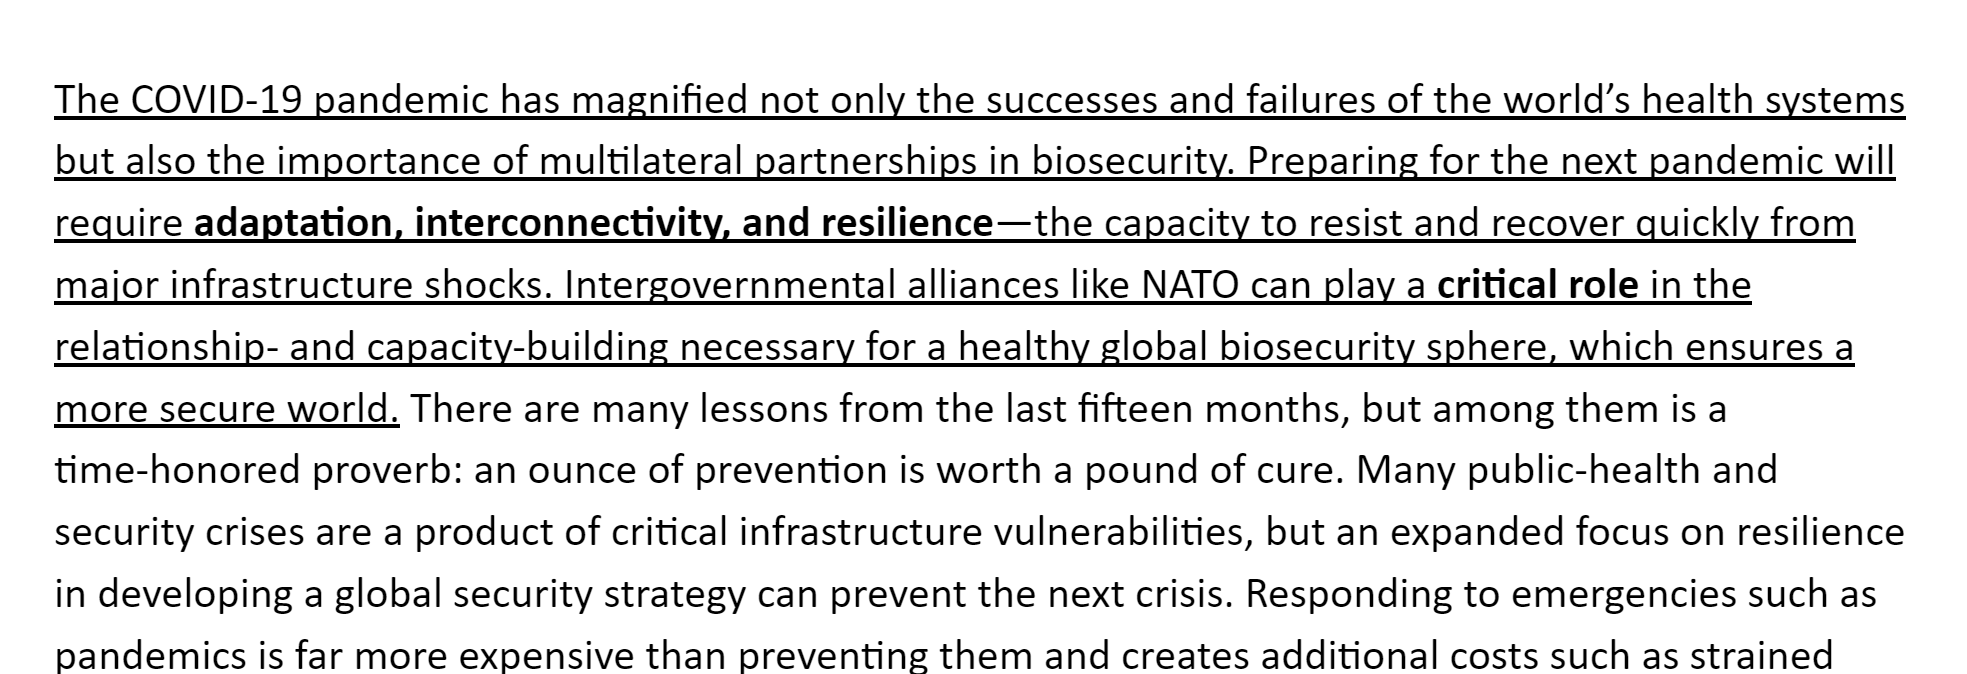
The same article text is shown on the left and right. On the left, there are links visibly embedded and the text is bolded. On the right, all text is selected with no bolding or embedded links.
Underline & Emphasis
Use the Underline function to underline relevant parts of the article text that you may want to read as part of the card (this is the same as the underline function in any text editor). The Emphasis function both underlines and bolds text.

Shrink
Use the Shrink function to make all text that is not underlined in a card size 8 font. This saves space and can make it easier to read cards.
Organizing Files with Headings
Some of the functions format specific lines as headings in the document. You can click headings in the document outline to quickly jump between sections. In the descending order, they are:
Pocket, the highest level, is often used for the title of the document (name of the argument for prepared files or the specific speech being given for a speech doc).
The Hat function is for categorizing larger groups of arguments, which vary by preference; in files for offcase positions, hats may separate 1NC shells from 2NC/1NR blocks, for example.
The Block function is often used to title and organize prepared arguments (i.e., Block is for blocks) such as overviews and answers to anticipated arguments.
The Tag function is for individual arguments, including both the tags on cards and analytic arguments.
The Cite function is for formatting the citation of a piece of evidence, but doesn’t actually create a heading that appears in the document outline.

In the document, the word Pocket is in the largest size centered on its own line. On the next line, the word Hat is shown centered in smaller text and underlined. On the next line, centered in even smaller text, the underlined word Block is shown. On the next line, left-aligned in gray, bolded text, it says “This is a tag.” On the final line, in left-aligned, bolded black text, it says “Cite ‘22”. To the left of the document, a pane titled “Summary includes an Outline that shows each line nested under the last, with Pocket at the top level and “This is a tag at the lowest level”

Viewing Outlines
If you ever want to navigate through your file more efficiently, make sure to open the outline so you can jump between different sections quickly. Make sure “Show outline” is checked under the View tab if you don’t see the outline.
Speech Doc Functions & In-Round Usage
The Speech tools are designed to help you efficiently put together and read speech docs during rounds using your prepared files.

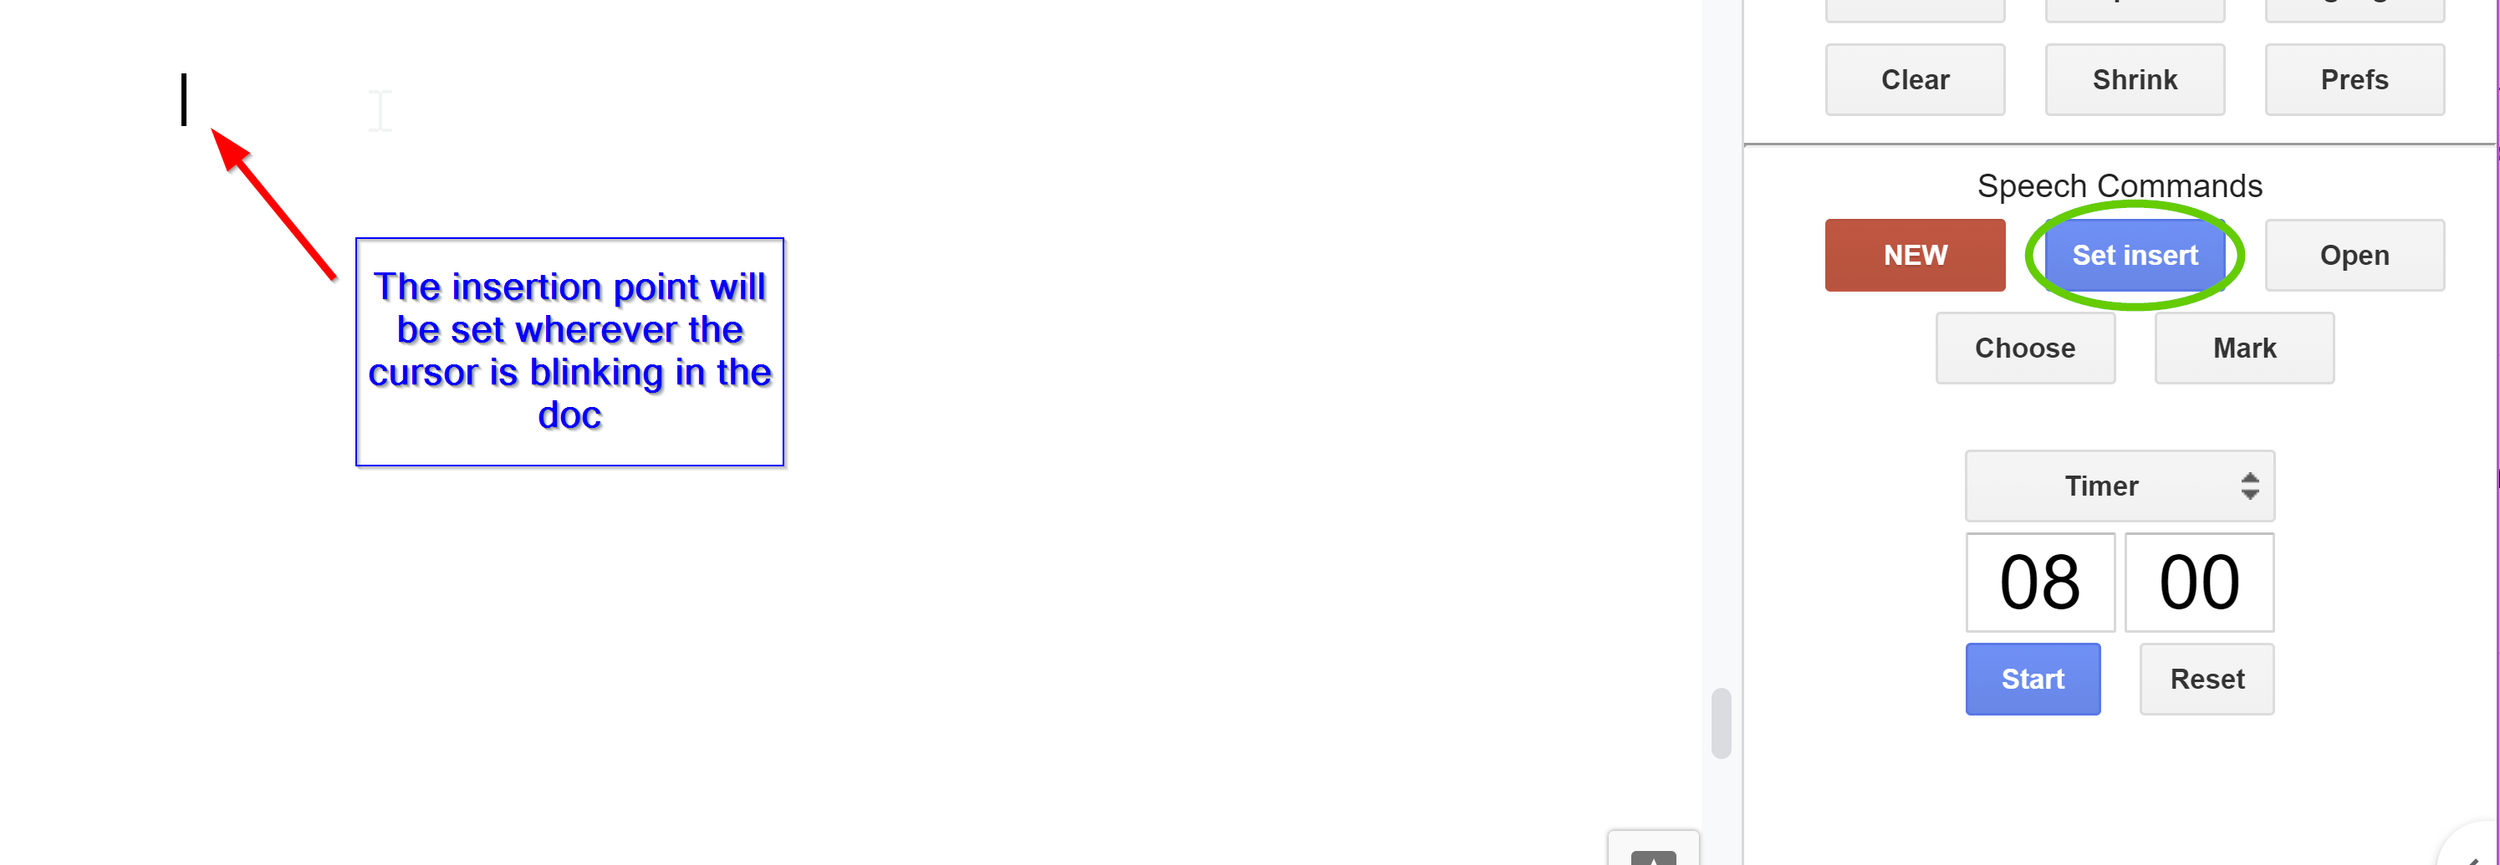
A box labeled “Speech Commands” has buttons labeled NEW, Set insert, Open, Choose, and Mark. A timer set to 8 minutes is below the box.
Preparing Speeches
Many of the speech functions revolve around sending things to the active speech doc. The active speech doc should be the doc that you are working on for the next speech you are going to give. You can use the currently open doc as a speech doc with Open, make any existing doc you have the active speech doc with Choose, or create a blank, new speech doc with New. Once you have set an active speech doc, you will be able to send parts of your other files to the speech doc.
Set insert
In the active speech doc, put the cursor wherever you want the other files to send text, then click Set insert from the sidebar. If you don’t see Set insert, you are not in the active speech doc.

Send to speech doc
From your other files, put the cursor on the heading for the arguments you want to send, then click “Send to” to copy that heading and everything nested under it to the speech doc.
If you copy a block, for example, every tag under that block will be included when it is sent to the speech doc.
Using the “Send to” function and having an organized, prepared file will make it much easier to put together speech docs quickly during rounds. Even if you have to use Google Docs offline, having an organized file will make it easy to navigate the file to manually copy/paste arguments.
Reading Speeches

Full screen mode
To make it easier to read, you can enable Full Screen under the View tab. Press Esc to leave this mode. If you open the sidebar before enabling Full Screen, it will stay open.
In this mode, you can use the Page Up and Page Down keys to scroll quickly, and use the timer and mark functions in the sidebar.
If you can’t get through everything you’ve highlighted in a specific card and want to skip to the next one during your speech, you must indicate where you are stopping in the card by marking it. Say “mark the card at [whatever word you stop at]” and use the Mark function from the sidebar to visually indicate on the doc where you marked it (put the cursor on the word and then click Mark; if successful, you should see that it added a bookmark to the doc). If you are not using the sidebar while reading and need to mark cards manually, you can go back and do this after the speech or have your partner mark it while you speak by changing the highlighting color where you marked it. If you mark cards during your speech, you should immediately send a marked copy of the speech to everyone after you finish.
Sending your speech docs
Before you start any speech, if it has any evidence at all, it should be sent out to everyone in the round via email chain. The speech doc you send should have only the cards in the speech you are about to give, highlighted exactly as you intend to read it. You should NOT send the entire file that includes what you are reading.
Please save a copy of your speech and send it out as an email attachment. Don’t copy/paste the speech into the body of the email or send a link to your Google Doc (you can’t upload either of those to the caselist wiki after the round!).

Download Settings
Make sure that you know how your browser handles downloads. In Google Chrome, go to your browser settings, then the Downloads menu to check.
By default, Google Chrome will send all downloads to a specific folder (typically your Downloads folder). You can change the default download location here.
The optimal solution is for the browser to ask where to save each file before downloading, which will have to be toggled on manually.

Downloading Speech Docs
When you have a speech to send out during a round, go to File > Download > Microsoft Word (.docx) to save a local copy of your speech doc that can be attached to the email chain.
Microsoft Word (.docx) is the best format to download as to make it easier for others to copy/paste text and so that the caselist wiki can auto-detect cites from headings.

Know Where Your Speech Is
If you set your browser to ask where to save downloads, you should be able to choose the folder on your computer and rename your speech doc. You can put all the speech docs for a round in their own folder to keep things organized. Try to give your speech docs useful titles that indicate which speech, round, opposing team, and tournament it is.
Examples:
1AC Round 4 Greenhill vs Westlake ST
2NC Round 3 Samford vs Midtown WN